Campfire Cooking for Beginners: Real Meals Over Real Fire (No Freeze-Dried Pouches)
Campfire cooking for beginners — learn fire management, essential cast iron gear from $24.99, 3 easy campfire recipes, and the stove-vs-fire decision. No gourmet skills required.
Your first campfire cooking attempt probably went like this: hot dogs on a stick, black on the outside, cold in the middle, eaten standing up because you forgot chairs. Mine did. The second attempt — a cast iron skillet of scrambled eggs that stuck so badly I spent 45 minutes scrubbing it with sand — wasn't much better.
Campfire cooking has a learning curve, but it's a short one. Once you understand fire management, pick the right tools, and internalize about three techniques, you're making meals that taste better than anything from your kitchen at home. Something about wood smoke and open air does that.
Fire First, Food Second
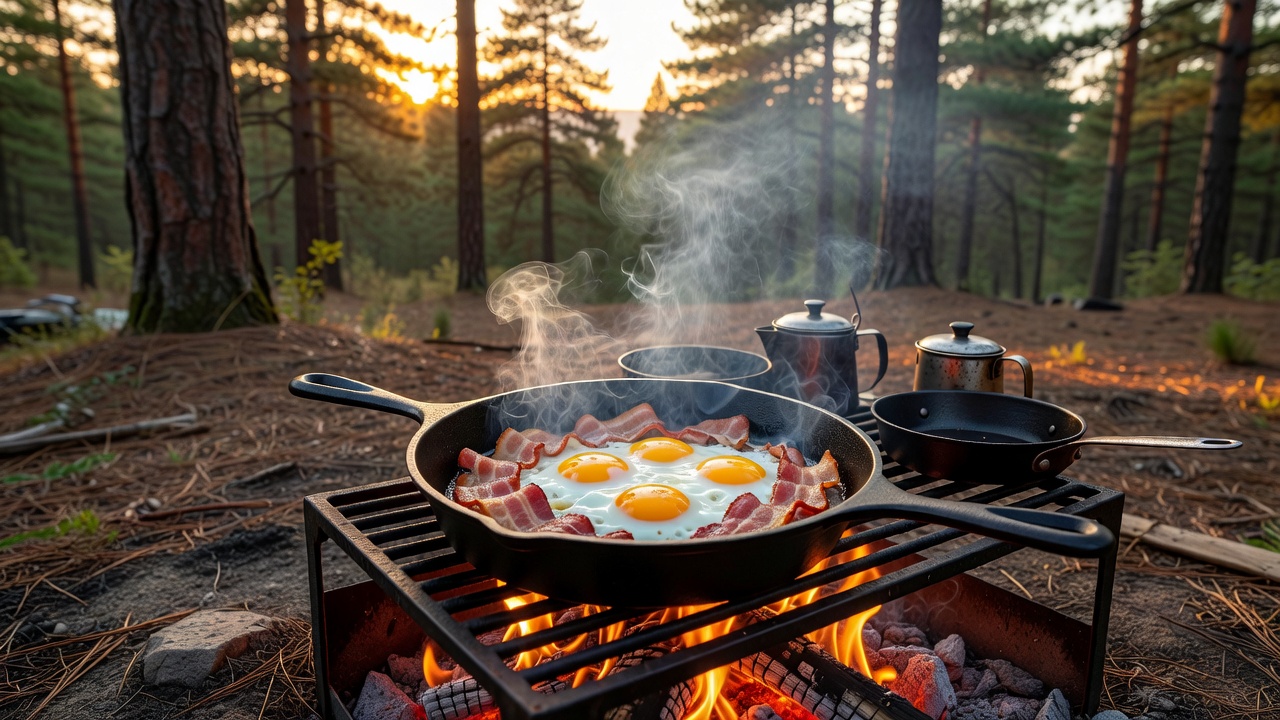
The single biggest beginner mistake: putting food over flames. Flames are hot, uneven, and leave soot on everything. What you want is coals — the glowing red-orange bed that forms after the fire has burned for 30-45 minutes. Coals deliver steady, predictable heat without the flare-ups that burn one side of your food while leaving the other raw.
The 30-minute rule: Start your fire at least 30 minutes before you plan to cook. Build it bigger than you think you need — you can always spread coals out, but you can't speed up the burn-down process. Hardwood (oak, hickory, maple) produces better cooking coals than softwood (pine, cedar). Softwood burns hot and fast, good for boiling water, terrible for sustained cooking heat.
If you're at a campground with a fire ring and grate, position the grate at 6-8 inches above the coal bed for medium heat. Lower for searing, higher for simmering. The "hand test" works: hold your hand at cooking height above the coals. If you can keep it there for 2-3 seconds before pulling away, that's high heat (searing). 4-5 seconds is medium (general cooking). 6+ seconds is low (simmering, warming).
Campgrounds with fire restrictions: Many Western campgrounds ban open fires during dry season (June-October). Check before you go. In fire-ban conditions, a propane camp stove like the Coleman RoadTrip 225 Portable Grill ($159.99) gives you two independently-controlled burners on a folding stand — it's not a campfire, but it's better than cold sandwiches for a week.
The Only Pan You Actually Need
If you buy one piece of campfire cookware, make it a cast iron skillet. The Lodge 10.25 Inch Pre-Seasoned Cast Iron Skillet ($24.99, 164,000+ reviews, 4.7 stars) is the one I reach for on every trip. It does everything: sear steaks, fry eggs, bake cornbread, simmer chili. Works directly on coals, on a campfire grate, or on a propane burner. The pre-seasoned surface means you can cook on it straight out of the box — no seasoning ritual required.
Cast iron's superpower is heat retention. Once hot, it stays hot. That means you get a proper sear on meat even as you add cold ingredients, and it stays warm enough to serve from for 10+ minutes after you pull it off the fire. The downside is weight — 5.3 pounds means this is car-camping and base-camp cooking, not backpacking. For backpacking, the MSR PocketRocket 2 Ultralight Stove ($49.95, 2.6 oz) paired with a titanium mug is the ultralight alternative — boils water in 3 minutes and weighs less than a deck of cards.
Cast iron care at camp: Don't use soap. Scrape with a spatula while the pan is still warm, wipe with a paper towel, and apply a thin coat of oil. If food sticks badly, add water while the pan is hot and scrape with a wooden spatula — the steam releases the gunk. Dry thoroughly over residual heat or you'll get rust by morning.
Stove vs. Fire: When to Use What
You don't have to cook everything over a fire. Here's my decision matrix after years of trial and error:
Campfire wins for: Steaks and burgers (smoke flavor, high heat sear), cast iron skillet dishes (cornbread, hash, frittatas), anything that benefits from wood smoke (chili, stew), and the experience itself — there's no propane burner that replaces sitting around a fire with a skillet of something sizzling.
Stove wins for: Morning coffee (you want it NOW, not in 30 minutes), boiling pasta water (fast, consistent), precise temperature control (pancakes, delicate sauces), and fire-ban conditions. The Stanley Adventure 9-Piece Cook Set ($44.99) nests a pot, pan, cutting board, spatula, ladle, and four plates into one compact bundle — everything you need for stove cooking in a package smaller than a shoebox.
Coffee matters: The AeroPress Go Portable Coffee Press ($39.95) is our go-to camp coffee maker — 2-minute brew, zero bitterness, and the whole thing nests into its own travel mug. Weighs 11.5 oz and makes a cup that beats any percolator. If you're the "coffee first, fire second" type, set it up on the stove while the fire catches.
Hybrid approach: Start breakfast coffee on the stove while the fire burns down to coals, then move to the campfire for the main cooking. By the time coffee is ready, your coal bed is perfect for eggs and bacon in the cast iron.
Three Campfire Recipes Anyone Can Make
These are the recipes I teach friends on their first camping trip. They're forgiving, ingredient-flexible, and impressive enough that people will think you know what you're doing.
Campfire Cast Iron Breakfast Hash
This is the one-pan breakfast that solves the problem of cooking for a group when everyone wakes up at different times. Make it once, keep it warm on the edge of the coals, and people serve themselves.
What you need: 4-5 Yukon Gold potatoes (diced small — they cook faster), 1 onion (diced), 1 bell pepper (diced), 6 eggs, breakfast sausage or bacon (pre-cooked at home to save camp time), salt, pepper, oil.
How: Get your coal bed to medium heat. Oil the skillet, add potatoes and onions first (they take longest), stir every 3-4 minutes until potatoes are golden and tender (~15 minutes). Add peppers and pre-cooked sausage, cook 5 more minutes. Crack eggs directly into the hash, cover with foil if you have it, and let the eggs set on top (~4 minutes). Serve from the skillet. Feeds 4.
Make it your own: Swap sausage for leftover steak from last night's dinner. Add a handful of spinach at the end for greens. Shredded cheese on top right before the eggs set.
Coal-Roasted Foil Packet Dinner
This is the camp version of a sheet-pan dinner, and it's genius because there's zero cleanup — you eat out of the foil.
What you need: Heavy-duty aluminum foil, protein (salmon fillets, chicken thighs, or Italian sausage work best), thin-sliced potatoes, sliced zucchini or summer squash, cherry tomatoes, butter, salt, pepper, lemon slices.
How: Tear off a 18-inch sheet of foil. Layer potatoes first (they need the most heat), then protein, then vegetables. Add a pat of butter, season generously, squeeze lemon over everything. Fold foil into a sealed packet — double-fold all edges so steam doesn't escape. Place directly on coals (not flames), cook 12-15 minutes for fish, 20-25 minutes for chicken. Carefully open (steam will blast out), eat straight from the foil.
The steam is the secret ingredient — the packet braises the food in its own juices. Nothing dries out. This is also the best way to cook vegetables at camp.
Dutch Oven-Style Skillet Cobbler
Cast iron skillets can fake a Dutch oven in a pinch. This dessert takes 5 minutes of prep and makes you look like a campfire wizard.
What you need: 2 cans of pie filling (peach or cherry), 1 box yellow cake mix, 1 stick of butter (cut into pats), cinnamon.
How: Dump both cans of pie filling into the skillet and spread evenly. Sprinkle the DRY cake mix evenly over the top — do not mix. Distribute butter pats across the surface. Sprinkle cinnamon. Cover tightly with foil. Place on medium-low coals and shovel a few coals onto the foil lid (this creates top-down heat like a real Dutch oven). Cook 25-30 minutes. The cake mix absorbs moisture from the fruit below and the butter melts down through, creating a golden crust on top and gooey fruit underneath.
Serve with vanilla ice cream if you brought a cooler. The YETI Hopper Flip 12 Soft Cooler ($250) keeps ice solid for days — overkill for weekend trips but if you're the person who brings real ice cream to a campsite, you're camp-famous instantly.
Hydration and Cleanup
Cooking at camp means dishes, and dishes at camp mean hauling water. Here's what works:
Owala FreeSip Insulated Water Bottle ($35.99) or Nalgene Wide Mouth 32oz ($15.99) for personal hydration while cooking. The Owala keeps ice water cold for hours even next to a fire — the Nalgene is indestructible and boilsafe if you need emergency hot water.
Eating setup: The UCO 4-Piece Mess Kit ($24.99) is a complete camp dining system in one 9-oz package — plate, bowl, and 3-in-1 Spork that nest together with a bungee tether. The rubberized bottom grips the table so it won't slide off your lap onto the dirt. One per camper and you're set.
For dish cleanup: heat water in your pot on residual coals after cooking, add a drop of biodegradable camp soap, and wash away from water sources (200 feet minimum). A collapsible wash basin makes this civilized — or you can go the foil-packet route and skip dishes entirely.
Filter your water: If you're camping anywhere without potable water spigots, the Sawyer Squeeze Water Filter ($34.95) screws onto standard water bottles and filters 100,000 gallons — it'll outlast your camping career.
The Cold-Weather Factor
Campfire cooking in October is a different game than July. Your fire is also your heat source, so you're managing it for both warmth and cooking simultaneously. Coals burn down faster in wind. Ingredients freeze if you leave them out overnight. Cast iron handles cold weather beautifully — it holds heat so well that wind doesn't drop the pan temperature the way it does with thin cookware.
For a full breakdown of keeping your whole camp warm (not just your skillet), our cold-weather camping system guide covers sleeping bags, pads, tent selection, and the clothing layering strategy that makes 30-degree nights comfortable.
Fall is also peak campfire-cooking season — cool enough that standing next to a fire is pleasant, and the seasonal ingredients (apples, squash, root vegetables) are made for cast iron. Our fall camping gear checklist covers everything else you need for shoulder-season trips.
What I'd Tell My Past Self on That First Trip
Bring less food and better tools. You don't need a full spice rack — salt, pepper, and one all-purpose seasoning blend cover 90% of camp meals. You don't need a three-burner stove AND a campfire setup — pick one heat source and learn it. You don't need to plan elaborate meals — a hot breakfast and a one-pan dinner is a successful camp food day.
The fire management thing? It clicks faster than you think. After two trips you'll be building the right-size fire, judging coal readiness by color, and moving pans around the grate like you've been doing it for years.
And get the cast iron. $24.99 for a Lodge skillet that will outlive you is the best value in outdoor cooking.
Now go build a fire. Wait 30 minutes. Then cook something real.
<!-- AFFILIATE_DISCLOSURE -->