Campfire Basics: How to Build, Maintain & Cook Over a Campfire (2026 Guide)
Learn campfire basics for 2026: how to build a fire from scratch, maintain steady coals, and cook over an open flame with Lodge cast iron and Stanley camp cookware. Complete guide for first-time campfire builders.
There's nothing quite like sitting around a crackling campfire as the sun drops behind the ridgeline — the smell of woodsmoke, the warmth on your face, the sound of something sizzling in a cast iron skillet. But if you've ever crouched in front of a pile of damp twigs, lighter flickering uselessly while your friends pretend not to watch, you know: building a good campfire is a skill, not a given.
I've built hundreds of campfires across everything from rainy Pacific Northwest campgrounds to high-desert dispersed sites, and I've made every mistake in the book. This guide covers campfire basics from scratch — how to select materials, build a fire that actually lights, maintain cooking coals, and cook a real meal over an open flame.
Fire Building Fundamentals: The Three Ingredients
Every campfire needs three things, and if you're missing one, you're just making smoke:
Tinder — The flash point. Dry grass, birch bark, cotton balls dipped in petroleum jelly, commercial fire starters. Tinder catches the spark.
Kindling — The bridge. Pencil-thick twigs and small sticks that catch from the tinder and burn hot enough to ignite your fuel wood.
Fuel wood — The workhorse. Wrist-thick branches and split logs that sustain the fire for hours. Use dead, downed wood (never cut live trees) or bring your own from a local source to avoid transporting invasive pests.
The most common rookie mistake? Jumping straight to fuel wood. You need a proper progression: spark → tinder → kindling → fuel wood. Skip a step and you'll be blowing on a smoldering log all evening.
What to Use as a Fire Starter
Modern campers have better options than rubbing sticks together. Here are our favorites:
FUKKUDA Electric Arc Lighter ($5.99) — This USB-rechargeable plasma arc lighter is a game-changer for campfires. It's windproof (the arc works in gusts that blow out traditional flames), flameless (no butane to run out mid-trip), and the flexible neck reaches deep into your fire lay. At under $6, it's the best fire-starting upgrade you'll make this year.
Flame Bird 2-Pack Electric Lighter ($6.29) — The two-pack value play. Keep one in your camp kitchen bin and one in your daypack. Same plasma arc technology, same windproof performance. The flexible neck design means you can light your fire from the bottom up without burning your knuckles.
Pro tip: Even with electric lighters, always pack a backup. A $1 Bic lighter in a ziplock bag weighs nothing and saves the trip when your rechargeable dies. I wrap mine in a strip of duct tape — the tape doubles as emergency tinder.
Three Fire Structures (and When to Use Each)
1. The Teepee — Best for Quick Flames and Social Fires
Lean kindling sticks against each other like a teepee over your tinder bundle, leaving a gap to insert your lighter. The teepee creates natural airflow up through the center and burns hot and fast.
Best for: Boiling water quickly, warming hands, fires you just want to stare at.
Watch out: Teepees collapse inward as they burn. Build them smaller than you think — a 12-inch teepee burns more reliably than a 2-foot one.
2. The Log Cabin — Best for Cooking
Stack two parallel logs, then two more perpendicular on top (like Lincoln Logs). Fill the center with tinder and kindling. The log cabin creates a stable, flat-top coal bed that's ideal for placing a skillet or Dutch oven.
Best for: Campfire cooking, long-burning fires, fires you want to maintain for hours.
Pro move: Build a mini-teepee inside the log cabin so you get the quick-start advantage of the teepee with the cooking stability of the cabin.
3. The Lean-To — Best for Windy Conditions
Stick a thick "backbone" log into the ground at an angle (or lean it against a fire ring rock), then lean kindling against it like a roof. Place tinder underneath. The backbone blocks wind and the lean-to structure shields the flame as it catches.
Best for: Windy ridgeline campsites, beach camping, exposed alpine sites.
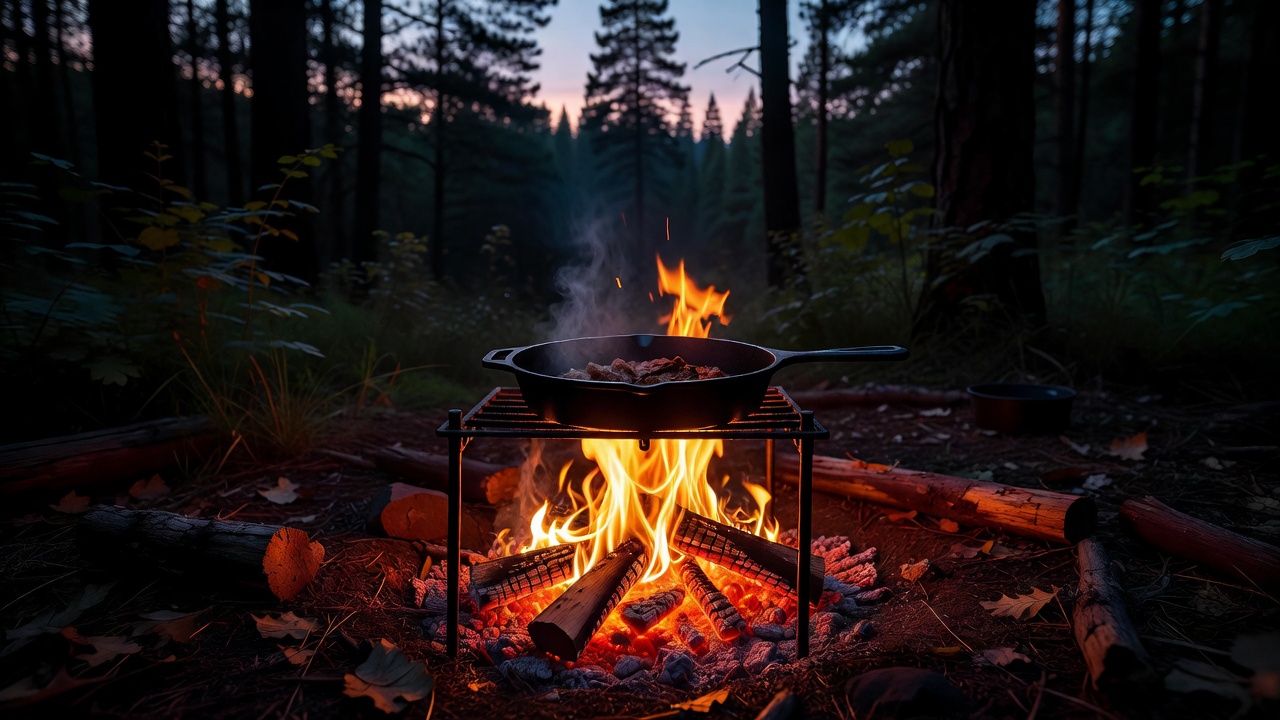
Building Cooking Coals (The 20-Minute Rule)
Raw flames are terrible for cooking — they scorch food unevenly and leave a sooty black mess. What you want is a bed of glowing coals, and that takes patience.
The 20-minute rule: Once your fire is established, let it burn for at least 20 minutes (longer with hardwood) before you start cooking. You're looking for embers that glow red-orange, not yellow flames licking up from fresh logs.
Signs your coals are ready:
- You can hold your hand 6 inches above the coal bed for only 2-3 seconds
- The coals are ash-gray on the surface, glowing underneath
- No visible flames — just steady radiant heat
Shift coals around with a stick to create heat zones: a hot zone directly over the deepest coals and a cooler zone off to the side for keeping food warm.
Campfire Cooking Gear: What You Actually Need
You don't need a full chuckwagon. Three pieces of gear cover 90% of campfire meals:
Lodge Cast Iron Combo Cooker ($49.97) — The Swiss Army knife of campfire cooking. This 2-piece set gives you a 3.2-quart deep pot and a 10.25-inch skillet that doubles as a lid. Cast iron thrives over open coals — it holds heat evenly, develops a natural non-stick seasoning over time, and you can bury it directly in the coals for Dutch oven baking. At $50, it's the best campfire cooking investment you'll make. I've made everything from skillet cornbread to deep-dish chili in mine.
Stanley Adventure 9-Piece Fry Pan Cook Set ($44.99) — When you need more than one pan going at once. This 9-piece set includes multiple pots and pans that nest together for compact storage. The stainless steel construction handles direct flame contact and cleans up easily. Great for group camp breakfasts where you're juggling eggs, bacon, and hash browns simultaneously.
Stanley Adventure All-in-One 2-Bowl Camp Cook Set ($24.95) — The minimalist's camp kitchen. Two bowls, integrated utensils, and a compact nesting design. Perfect for solo campers or backpackers who want a hot meal without the weight penalty. At $25, it pairs perfectly with a single-burner stove or a small campfire coal bed.
What You Can Cook Over a Campfire (Beyond Hot Dogs)
Once you have your coal bed ready, the possibilities expand fast:
Direct coals: Wrap potatoes, corn on the cob, or foil-packet meals and nestle them directly into the coals. Turn every 10 minutes.
Skillet on coals: Place your Lodge skillet directly on the coal bed. Perfect for searing steak, frying bacon, or making campfire pancakes. The key is a flat, stable coal bed — no wobbly rocks.
Dutch oven baking: Bury your Dutch oven in coals (with coals on the lid too). This creates an oven effect — think campfire biscuits, cobblers, and even fresh bread. The general rule for 350°F equivalent: double the Dutch oven's diameter in inches, and that's how many charcoal briquettes you need (e.g., a 10-inch oven needs ~20 briquettes, with 2/3 on top and 1/3 underneath).
Tripod hanging: For stews and soups, hang a pot from a campfire tripod over the fire. This gives you adjustable heat control — raise it to simmer, lower it to boil.
Campfire Safety That Actually Matters
Before You Light
- Check fire restrictions. Many national forests and parks issue seasonal burn bans in dry summer months. Check the park website or call the ranger station before you go.
- Use established fire rings. Don't build new fire scars. If dispersed camping, use a fire pan or build on bare mineral soil, not duff (the decomposing organic layer that can smolder underground for days).
- Clear a 10-foot radius. Remove pine needles, dry leaves, and low-hanging branches.
- Have water and a shovel ready. Before you strike the first spark, fill a bucket with water and keep a shovel nearby.
While It's Burning
- Never leave a fire unattended. Not for "just five minutes."
- Keep fires small. A fire the size of a car tire is plenty for cooking — bonfires are environmental theater.
- Watch for wind shifts. A sudden gust can blow embers into dry grass 30 feet away.
Extinguishing
The "cold to the back of your hand" test: douse with water, stir the ashes, douse again. If you can hold the back of your hand an inch above the ash pile for 5 seconds, it's out. If it's still warm, keep adding water and stirring. Smoldering coals have reignited hours after campers left.
Bug Protection for Campfire Evenings
Nothing kills the campfire vibe faster than mosquitoes finding your ankles. While smoke provides some natural repellent, don't rely on it:
Babyganics Insect Spray ($5.48) — Plant-based DEET-free formula using essential oils. Safe for kids and pets, and the 2oz travel size slips into any pocket. Reapply every 2-3 hours when you're sweating.
Cliganic Mosquito Repellent Bracelets ($9.99 for 10-pack) — Wear one on each ankle and wrist around the fire. They're DEET-free, individually wrapped for freshness, and each one lasts about 10 days once opened. At under a dollar per bracelet, they're cheap insurance.
Common Campfire Mistakes (Learn From Mine)
I've made every mistake on this list so you don't have to.
Using river rocks for the fire ring. River rocks contain trapped moisture that expands into steam when heated. The rock explodes — I learned this the hard way when a fist-sized shard flew past my ear. Use dry rocks from above the treeline, or better yet, use the existing fire ring.
Building the fire too big for cooking. A towering bonfire looks impressive but you can't get near it without singeing your eyebrows. A small, controlled fire with consistent coals cooks better than an inferno.
Cooking directly in flames rather than coals. Flames deposit unburned carbon (soot) on your food and cook unevenly. Wait for coals.
Not bringing enough kindling. I've spent more time hunting for dry twigs in the dark than I care to admit. Bring more kindling than you think you need, especially if you're camping after rain.
Leaving food scraps in the fire pit. Attracts wildlife overnight — raccoons, bears, skunks. Burn food scraps completely or pack them out. At minimum 200 feet from camp if you're in bear country.
Campfire Pro Tips (Field-Tested)
- Cotton balls + Vaseline = best DIY fire starter. Soak cotton balls in petroleum jelly, store in a small ziplock. Each one burns for 3-4 minutes.
- Collect kindling before dark. Nothing's worse than stumbling through the woods at 9 PM looking for dry sticks.
- Fatwood is nature's lighter fluid. If you find a pine stump with resin-soaked heartwood (fatwood), grab a few pieces. It ignites instantly and burns hot even when damp.
- Position your camp chair upwind. Sounds obvious, but every campsite has a prevailing wind. Sit on the upwind side and the smoke follows someone else.
- Bring a NEMO Moonlite Reclining Camp Chair ($169.95) for the ultimate fireside lounging. It reclines, packs small, and the suspended seat means no crossbar digging into your thighs after an hour of s'mores.
If you're ready to take your campfire cooking further, check out our Cast Iron Campfire Recipes guide for specific meal ideas, and our Camp Cooking for Beginners guide for setup strategies. For fire safety in the backcountry, read our Leave No Trace principles guide.
A campfire is the heart of any camping trip. Master the basics — the right structure, the right fuel progression, and the right cooking coals — and you'll spend less time fighting smoke and more time watching the flames dance under a star-filled sky.
<!-- AFFILIATE_DISCLOSURE -->