How to Pack a Cooler for a Weekend Camping Trip: Keep Food Cold for 3 Days
Master cooler packing for weekend camping: layering strategy, ice-to-food ratio, YETI vs budget cooler test results, and the 3-zone system that keeps everything cold through Sunday brunch.
There's a specific kind of disappointment that hits at 10 AM on Saturday when you reach into the cooler for the bacon and find it swimming in lukewarm water, the cheese is sweating, and whatever leaked from the burger package has turned the bottom into a primordial soup. You're 90 minutes from the nearest grocery store, and breakfast just became granola bars again.
Packing a cooler isn't rocket science, but it's also not "throw everything in with a bag of ice from the gas station." The difference between a cooler that's still cold on Sunday afternoon and one that's warm by Saturday morning comes down to three things: the cooler itself, how you layer it, and the ice-to-food ratio. Get those three right, and you can keep food safe and cold for a full 3-day weekend — even in 85°F heat.
The Cooler Matters More Than You Think
Before we talk about packing technique, let's address the elephant in the campground: your cooler itself.
A $25 styrofoam cooler from the drugstore will lose its ice in about 8 hours on a warm day. A basic plastic Coleman with a friction lid? Maybe 24 hours if you never open it. A rotomolded cooler with a rubber gasket seal (the kind that doubles as a bear-resistant food locker in some parks) will hold ice for 4-7 days.
You don't need to spend $450 to get good performance, but you do need to understand what you're working with so you can plan your packing accordingly.
Premium: YETI Tundra Haul Portable Wheeled Cooler — $450
This is the cooler that changed the game. Rotomolded construction, 2-3 inches of polyurethane insulation, a rubber freezer-style gasket, and — critically — wheels. The Tundra Haul is the only premium cooler that doesn't require two people to move when it's fully loaded. At 37 lbs empty it's heavy, but the wheels and curved handle make it a one-person operation from truck to picnic table.
Ice retention: 5-7 days in moderate weather, 3-4 days in 85°F+ heat with proper packing. The gasket seal is the secret — it prevents warm air from sneaking in every time the lid closes, which is where most coolers lose their cold.
Best for: Families who camp 5+ weekends a year, multi-day trips where a cooler failure means ruined food and a ruined trip, and anyone who's tired of buying ice twice a day.
Budget: Titan by Arctic Zone Deep Freeze Cooler — $47
At one-tenth the price of the YETI, the Titan Deep Freeze punches absurdly above its weight class. It's a soft-sided cooler with a "zipperless" lid (magnetic closure — just push to open, and it self-seals) and a removable HardBody liner that gives it structure. The Deep Freeze insulation claims 2-3 day ice retention, and in real-world testing with proper packing, it genuinely delivers 48 hours in 75-80°F weather.
What you lose vs. YETI: Bear resistance (not rotomolded), shorter ice life in extreme heat (2 days vs 3-4), smaller capacity (30 cans vs the Haul's 45+), and it won't survive being dropped out of a truck. But for $47, it's the best price-to-performance ratio in camping coolers.
Ice retention: 2-3 days with proper packing. Pre-chill it overnight (throw a sacrificial bag of ice in the night before) for best results.
Best for: Weekend warriors, couples, solo campers, and anyone who wants YETI-level organization without YETI-level prices.
Which cooler for which trip?
- Day trip / picnic: Titan Deep Freeze is perfect — light, easy to carry, keeps drinks cold all afternoon
- Weekend car camping (2 people): Titan handles it if you pack smart. Bring a backup bag of ice for Sunday morning.
- Weekend car camping (family of 4+): YETI Tundra Haul. You need the capacity and the ice retention. A warm cooler on Sunday morning with hangry kids is not worth the $400 savings.
- 4+ day trips / bear country: YETI, no question. The bear-resistant certification alone is worth it in grizzly territory.
The 3-Zone Cooler Packing System
This is the system that changed my camping life. Instead of treating the cooler like a giant hole you fill randomly, divide it into three zones from bottom to top:
Zone 1 — The Foundation (bottom 25%): Frozen and Long-Haul Items
This layer sits directly on the ice (or frozen gel packs) at the bottom. Put everything here that you won't touch until Day 2 or 3:
- Frozen meat (steaks, burger patties, chicken — these act as secondary ice blocks)
- Frozen pre-made meals (chili, pasta sauce — frozen solid in zip-top bags)
- Drinks you won't open until Sunday
Why this works: Cold air sinks. The bottom of the cooler is the coldest zone, and items here essentially become part of your cooling system. Frozen meat is free ice that you get to eat later.
Zone 2 — The Middle (middle 50%): Daily Access Items
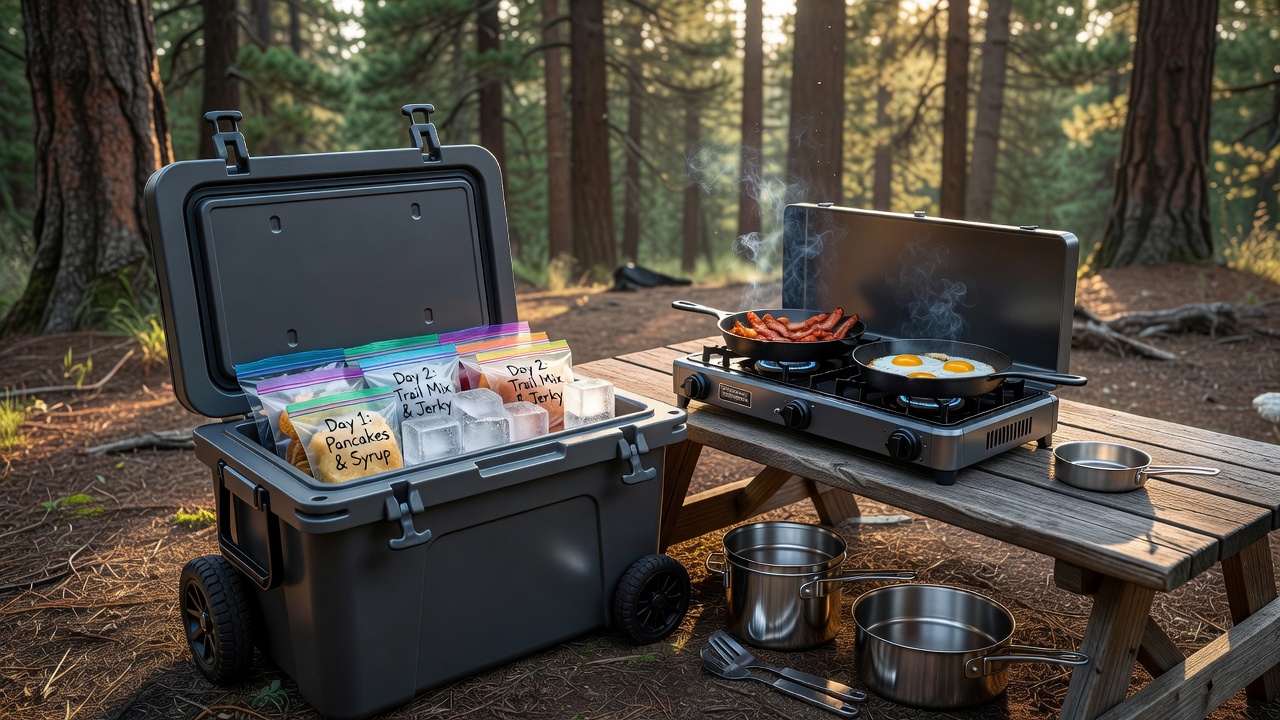
This is your working pantry. Items you'll access throughout the trip — think sandwich supplies, cheese, eggs, condiments, vegetables — go here, organized in clear containers or zip-top bags grouped by meal.
Critical rule: Group by MEAL, not by food type. Put Saturday breakfast items (bacon, eggs, butter) in one waterproof bag or container. Saturday dinner in another. Sunday breakfast in another. This way you open the cooler, grab ONE bag, close the cooler. No rummaging. No "where's the cheese" 30-second lid-open sessions that dump all your cold air.
How to organize: Reusable silicone bags (Stasher-style) or small waterproof dry bags work better than disposable zip-tops. Label them with masking tape and Sharpie: "SAT AM," "SAT PM," "SUN AM." Your future self at 7 AM with one eye open will thank you.
Zone 3 — The Top (top 25%): Drinks and Frequently-Accessed Items
Drinks go on top. Yes, this contradicts the "cold air sinks" rule — drinks at the bottom would stay colder. But here's the reality: you open the cooler for drinks 10x more often than you open it for dinner ingredients. Every drink retrieval dumps cold air. Put drinks on top to minimize the distance cold air has to travel to escape, and to prevent your dinner ingredients from being exposed to warm air every time someone grabs a soda.
Separate drink cooler: If you have the space, bring a second small cooler just for drinks. It gets opened all day, the ice melts faster, and you don't care if drinks are cold-but-not-frozen. The food cooler stays sealed except at meal prep time. This is the single biggest upgrade you can make to your camping kitchen logistics.
The Ice-to-Food Ratio That Actually Works
The internet will tell you "2:1 ice to food." That's a starting point, but here's what actually works in the real world:
| Condition | Recommended Ratio | Ice Type |
|---|---|---|
| Day trip (<12 hrs) | 1:1 | Cubed ice from gas station |
| Weekend, mild (65-75°F) | 1.5:1 | Block ice on bottom + cubes on top |
| Weekend, hot (80°F+) | 2:1 | Block ice + frozen water bottles + cubes |
| 3+ days, any temp | 3:1 | All block ice, frozen water bottles as backup |
Why block ice beats cubes: A solid block of ice melts much slower than cubes because it has less surface area relative to its volume. Put block ice at the very bottom of the cooler. Use cubed ice to fill gaps between food items. Frozen water bottles (filled 80% to allow for expansion) are dual-purpose: they keep things cold AND become drinking water when they melt.
Pre-chill everything: This is the free upgrade. Put all non-frozen food in your home refrigerator overnight before the trip. A room-temperature six-pack absorbs as much cooling energy as two pounds of melting ice. Cold food going in = less ice melting to cool it down.
Drain or don't drain?: Old-school advice says drain the meltwater because water conducts heat faster than air. Modern testing shows the opposite: keeping the cold water in the cooler actually helps maintain temperature, because the water itself is near-freezing and has higher thermal mass than air. The exception: if food packaging has leaked and the water is contaminated, drain and re-ice. This is why waterproof meal bags in Zone 2 matter — they prevent the "burger juice swamp" scenario.
Common Cooler Packing Mistakes
Mistake 1: Not pre-cooling the cooler itself
Bringing a cooler that's been sitting in a hot garage, loading it with cold food and ice, and expecting it to perform is like putting ice cubes in a hot pan and wondering why they melt instantly. The cooler walls absorb a massive amount of cooling energy before they even start keeping your food cold.
Fix: The night before, throw a sacrificial bag of ice in the empty cooler and close it. Next morning, dump the (now partially melted) ice and load fresh ice with your food. This "pre-chills" the cooler walls and buys you an extra 12-24 hours of cold.
Mistake 2: Opening the cooler like it's a refrigerator
Every time you open the lid, you exchange the cold air inside for warm outside air. A 30-second rummage session with the lid up can raise the internal temperature by 15-20°F.
Fix: Know what you need BEFORE you open the lid. Lift, grab the one meal bag you need, close. If you're cooking, pull everything for that meal in one motion and set it on the prep table. The meal-bag system (Zone 2 above) makes this automatic — grab Saturday dinner bag, close cooler, start cooking.
Mistake 3: Putting warm food or drinks in the cooler
Just bought ice and drinks on the drive to the campground? Those room-temperature sodas will melt a significant chunk of your ice before they even get cold.
Fix: Buy drinks the day before and refrigerate them at home. If you must add warm items mid-trip, bury them at the bottom of the drink cooler (not the food cooler) and add extra ice — they'll cool down overnight.
Mistake 4: Letting the cooler sit in direct sun
A cooler in direct sun on an 85°F day can be 20-30°F hotter on the outside surface than one in the shade, dramatically accelerating ice melt.
Fix: Park the cooler under the picnic table, behind the tent, or throw a reflective emergency blanket over it (silver side out). Even a wet towel draped over the top helps — evaporative cooling is real. If you're beach camping, dig a shallow hole in the sand under your shade canopy and nestle the cooler in — sand below the surface stays cool.
What to Cook with Your Perfectly-Chilled Ingredients
You've mastered cooler packing. Now use those still-cold ingredients to make actual meals that make your campsite neighbors jealous.
Breakfast: Camp Stove Bacon and Eggs
Pulling cold bacon and eggs from your Zone 2 Saturday AM bag, you fire up the Camp Chef Everest 2X ($189.99). Two 20,000 BTU burners mean you can fry bacon on one side and scramble eggs on the other simultaneously — no waiting, no cold food. The Everest's matchless ignition works in wind, and the stainless steel body shrugs off bacon grease splatter.
For solo campers or backpackers who want hot coffee and oatmeal FAST: the Jetboil Flash ($119.95) boils water in 100 seconds flat. It's not a full cooking system — you're not sautéing vegetables on it — but for morning coffee, instant oatmeal, and rehydrating backpacking meals, nothing is faster.
Cookware matters too. The Stanley Adventure 9-Piece Camp Cook Set ($44.99) nests together like Russian dolls and includes everything you need: 7-inch fry pan, 5.5-inch pot, vented lid, cutting board, spatula, ladle, plus plates and sporks for two. The whole set packs down to about the size of a Nalgene bottle, which means it doesn't eat up cooler space.
A Note for Dog Owners
If you're camping with your pup, summer heat is a serious concern. The Ruffwear Swamp Cooler Zip Dog Cooling Vest ($74.95) uses evaporative cooling to keep your dog's core temperature down. Wet it, wring it out, zip it on — the evaporation pulls heat away from your dog's chest and back. Pack a spare gallon of water just for the dog vest; your cooler's doing the heavy lifting for your food, but your dog needs separate hydration.
The Weekend Cooler Packing Checklist
Print this, tape it to your cooler, and never play "what did I forget" at the campsite again:
Hardware:
- Cooler pre-chilled overnight with sacrificial ice
- Block ice (1-2 blocks for bottom layer)
- Cubed ice (fill gaps between items)
- Frozen water bottles (4-6, filled 80%)
- Reusable ice packs for Zone 2 gaps
Organization:
- Waterproof meal bags labeled SAT AM / SAT PM / SUN AM
- Separate drink cooler (even a small soft-sided one counts)
- Sharpie and masking tape for labeling
- Small thermometer (optional but satisfying — watching your cooler hold 38°F on Sunday afternoon is deeply validating)
Food safety:
- Raw meat in sealed containers on bottom (prevent cross-contamination)
- Dairy and eggs in middle zone
- Produce in top zone (it freezes easily — keep it away from the ice blocks)
- Hand sanitizer at the cooler station (you're touching food after handling tent stakes and firewood)
Sun defense:
- Reflective blanket or wet towel for cooler cover
- Shade location scouted before unloading
Key Takeaway
A well-packed cooler is a three-day cold chain, not a bucket of ice with food floating in it. Layer frozen → daily access → drinks. Pack by meal, not by food type. Block ice on the bottom, cubes in the gaps. Pre-chill everything. And if you camp more than twice a year, invest in a cooler with a real gasket seal — the difference between Saturday bacon and Saturday disappointment is about half an inch of insulation rubber.
<!-- AFFILIATE_DISCLOSURE -->