Camp Kitchen Setup: How to Build an Outdoor Cooking System That Actually Works
Stop digging through coolers for ingredients. Learn how to organize a functional camp kitchen system with the right stove, cooler, cookware, and wash station — car camping meals made easy.
Picture this: you roll into camp at sunset after a long drive. The kids are hungry. You pop the tailgate and start digging through three different bins looking for the spatula. The propane hose is tangled with the lantern cord. Your cooler is buried under sleeping bags. By the time you fire up the stove, everyone's eating granola bars for dinner.
I've been there. Every camper has. And that's exactly why a well-planned camp kitchen is the single biggest quality-of-life upgrade you can make to your car camping setup.
A camp kitchen isn't just about cooking — it's about creating a system where everything has a place, meals come together efficiently, and cleanup doesn't feel like punishment. Here's how to build one.
Why Your Camp Kitchen Needs a System
Most people approach camp cooking the same way they pack their suitcase: toss everything in and hope for the best. The result is chaos — duplicate items, forgotten essentials, and meals that take twice as long as they should.
A system means you know exactly where your coffee setup lives. You can reach for the tongs without looking. Your cooler has zones — drinks on top, raw meat on the bottom, dairy in the middle. When dinner is done, cleanup takes ten minutes instead of thirty because you built a wash station before you started cooking.
The payoff isn't just convenience. When camp cooking is easy, you do more of it. You wake up and actually make that bacon-and-eggs breakfast instead of settling for a protein bar. You grill fresh fish instead of boiling another pouch of dehydrated pasta. The kitchen becomes a gathering place — the campfire's daytime counterpart.
The Four Zones of a Functional Camp Kitchen
Every good camp kitchen has four zones. Skip one and you'll feel the friction immediately.
Zone 1: Heat — Your Stove and Fuel
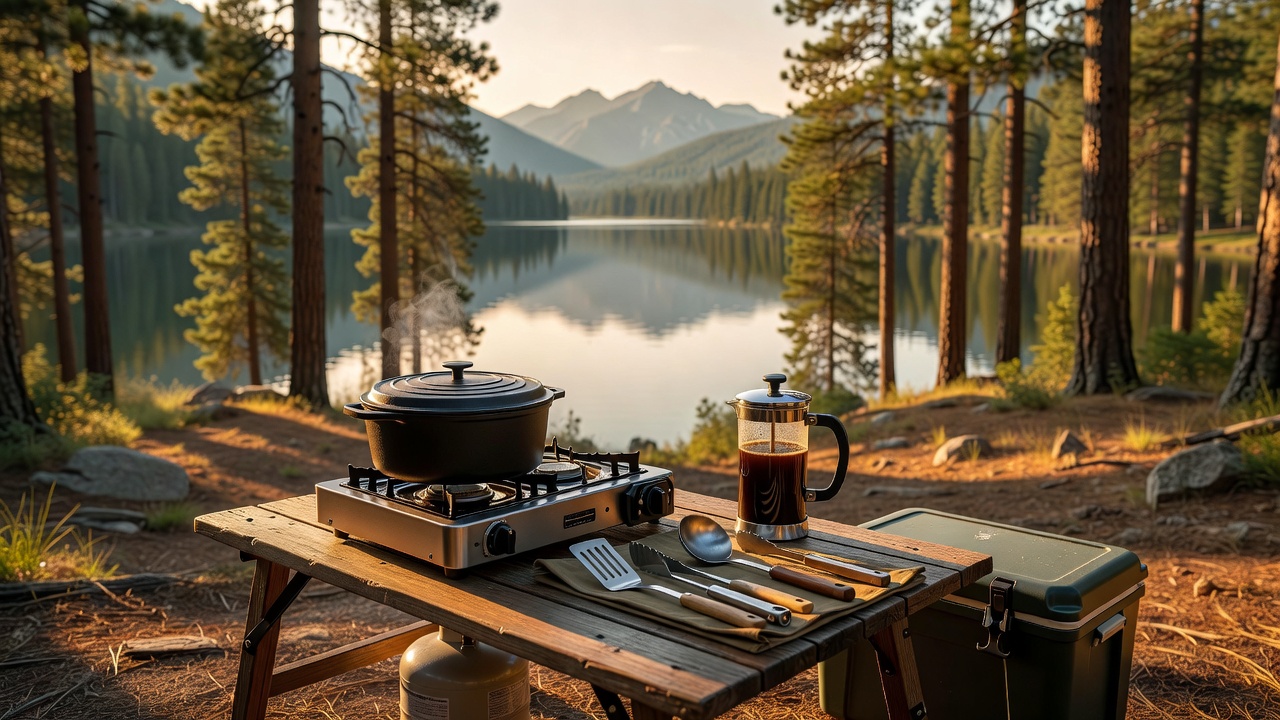
The stove is the heart of the kitchen. For car camping, a two-burner propane stove gives you flexibility a single burner can't match — boil water for coffee on one side while scrambling eggs on the other.
The Coleman Tabletop 2-in-1 Grill & Stove ($114.99) is a standout in this category. One side is a traditional burner with an adjustable flame, the other is a grill grate that gives you those proper sear marks on burgers and steaks. The whole unit folds into a compact case with a handle — it IS the carrying case. At just over a hundred bucks, it punches well above its weight class compared to dedicated camp grills that cost twice as much.
For groups or family meals, having a second heat source is a game-changer. A Lodge 5-Quart Cast Iron Double Dutch Oven ($49.99) can sit directly on coals while your stove handles the quick-cooking items. The lid doubles as a skillet — that's two cooking surfaces in one piece of gear. Cast iron holds heat like nothing else, and the Lodge pre-seasoned finish means you can cook on it the day you buy it.
Zone 2: Cold — Your Cooler Strategy
Your cooler is the second most important piece of your kitchen. A warm cooler ruins a camping trip faster than rain.
At the premium end, the YETI Tundra Haul Portable Wheeled Cooler ($450) is the gold standard. It's rotomolded, bear-resistant, and keeps ice for days — not hours. The built-in wheels and pull handle mean you don't need a second person to move it around camp. Yes, it's expensive. But if you camp more than four weekends a year, the ice retention alone pays for itself over a few seasons.
For budget-conscious campers, the Titan by Arctic Zone Deep Freeze Cooler ($46.99) is a clever alternative. The zipperless lid opens with one hand — grab a drink while holding a burger spatula in the other. The Deep Freeze insulation performs surprisingly well for the price point, and the hardbody shell gives it structure that soft coolers lack.
Pro tip: use two coolers if your group is 4+. One for drinks (opened constantly), one for food (stays closed). Every time you open a cooler, you lose about 30 minutes of ice life.
Zone 3: Prep — Your Workspace and Tools
This is where most camp kitchens fall apart. A wobbly picnic table and a cutting board balanced on your knees is not a prep station.
The Windhike Blackdog IGT Table ($55.26) solves the workspace problem with adjustable legs that handle uneven ground. It's designed for the IGT (Iron Grill Table) system, so you can slot in burners or grills directly into the table surface. Even without the IGT accessories, it gives you a stable, dedicated cooking surface separate from the eating table.
For coffee drinkers, the AeroPress Go Travel Coffee Press ($39.95) is the closest thing to a portable espresso machine. The whole setup — press, scoop, filters, and mug — nests into a cup-sized package. It brews a clean, smooth cup in about a minute with nothing but hot water and ground coffee. No electricity, no paper filters to pack out (it comes with a reusable metal filter). After three mornings of instant coffee granules that taste like regret, you'll wonder why you didn't buy one sooner.
Hydration is part of prep too. The Owala Star Wars FreeSip Sway Water Bottle ($44.99) keeps water cold for 24 hours with its double-wall stainless steel construction. The FreeSip spout lets you either sip through a straw (upright) or chug from the wide opening (tilted) — sounds like a gimmick until you're cooking over a hot stove and want a quick drink without stopping what you're doing.
Zone 4: Clean — Your Wash Station
Nobody talks about the wash station, and that's why every campsite dinner ends with greasy pans sitting in a plastic tub until morning.
The Sea to Summit Kitchen Sink ($24.95) is a 5-liter collapsible basin with a rigid rim that stays open while you scrub. Fill it with hot water and biodegradable soap, and you have a proper three-step system: wash, rinse, dry. When you're done, it folds flat to the size of a paperback book. For less than the cost of one restaurant dinner, it eliminates the worst part of camp cooking.
Set up your wash station BEFORE you start cooking. Fill it with hot water and position it within arm's reach of the stove. Wash as you go — a quick scrub while the pan is still warm takes ten seconds. A cold, caked-on mess the next morning takes ten minutes.
How to Pack Your Camp Kitchen
The goal isn't just to bring gear — it's to unpack once and cook all weekend. Here's my packing system, refined over dozens of trips:
The Kitchen Bin: One dedicated plastic tote (clear, with a locking lid) that holds everything cooking-related except the stove and cooler. Inside: spatula, tongs, chef's knife, cutting board (flexible plastic, rolls up), can opener, bottle opener, aluminum foil, ziplock bags, salt and pepper in small shakers, cooking oil in a leakproof squeeze bottle, dish soap, sponge, dish towel. Everything has a designated spot. You open the bin and you're ready to cook.
The Coffee Kit: A small dry bag containing the AeroPress Go, coffee grounds (pre-ground at home into a ziplock), and a small baggie of filters. This bag lives inside the kitchen bin. Morning routine: boil water, press coffee, done. The AeroPress rinses clean with a splash of hot water — no soap needed.
The Cooler Layout: Bottom layer: frozen meat (acts as ice packs). Middle layer: dairy, eggs, vegetables. Top layer: drinks, condiments, anything you'll grab during cooking. Pack in reverse order of when you'll use things — Friday dinner ingredients on top, Sunday lunch on the bottom.
The Dry Food Bag: A canvas tote with non-perishables: pasta, rice, canned beans, trail mix, granola bars, hot chocolate packets. This stays in the car — grab ingredients as needed, return the bag.
A Sample Weekend Menu (Tested on Real Trips)
Here's what a weekend of camp cooking looks like with this setup. All of these can be made on the two-burner Coleman stove with the Dutch oven handling one dish while the burner handles another.
Friday Dinner (arrival meal — quick and satisfying): Chicken fajitas — pre-sliced peppers and onions from home, chicken breast sliced thin. Sauté everything on the grill side of the Coleman, warm tortillas on the burner side. Salsa and sour cream from the cooler top layer. Total cook time: 15 minutes.
Saturday Breakfast (the big one): Cast iron scrambled eggs with bacon. Cook bacon first in the Lodge Dutch oven lid/skillet while the Dutch oven pot heats water for coffee. Once bacon is done, pour off most of the grease, scramble eggs in the same pan, add shredded cheese. The Owala water bottle gives you cold water for drinking while everything's sizzling.
Saturday Lunch (no-cook, no cleanup): Sandwiches assembled on the IGT table: bread, deli meat, cheese, lettuce from the cooler. Chips from the dry food bag. Ten minutes, zero dishes.
Saturday Dinner (the showstopper): Dutch oven chili. Brown ground beef in the Lodge Dutch oven over the Coleman burner. Add canned tomatoes, beans, chili seasoning from the dry food bag. Let it simmer with the lid on for 45 minutes while you enjoy camp. Serve with shredded cheese, sour cream, and tortilla chips. The Dutch oven's heat retention means it stays warm for second helpings.
Sunday Breakfast (easy exit): Oatmeal with toppings. Boil water on the Coleman, pour over instant oats, top with brown sugar, dried fruit, and nuts from the dry food bag. Coffee from the AeroPress. Clean the kitchen bin, wipe down the stove, break down the wash station. You're packed and rolling by 10 AM.
Common Camp Kitchen Mistakes (Learn From Mine)
I've made every mistake on this list at least once. Don't be me.
Bringing too many gadgets. The avocado slicer, the egg separator, the specialized corn-on-the-cob buttering tool — leave them all at home. A chef's knife, a cutting board, and a pair of tongs do 90% of what you need. Every gadget you bring is one more thing to wash and pack.
Forgetting the heat-resistant glove. Cast iron handles get HOT. I've burned myself reaching for a Dutch oven lid more times than I'll admit. A simple silicone oven mitt lives in my kitchen bin permanently now.
No wind screen. A gust of wind kills your stove's heat output instantly. Most picnic tables at established campgrounds have some windbreak, but if you're dispersed camping, bring a folding aluminum windscreen (they cost about $15 and weigh nothing).
Packing spices loose. Salt and pepper shakers open in transit. Every time. Transfer your spices to small screw-top containers or double-bag them in ziplocks. The dry food bag should never smell like cumin when you open it.
Cooking too close to the tent. Food smells attract wildlife. Set up your kitchen at least 100 feet from your sleeping area. If you're in bear country, the kitchen should be even farther — and everything scented (toothpaste, deodorant, sunscreen) should live in the kitchen bin, not the tent.
Not prepping at home. The single biggest camp kitchen upgrade is homework. Chop vegetables at home. Pre-mix dry ingredients. Marinate meat in a ziplock. Every minute you spend prepping in your actual kitchen saves five minutes of fumbling in the dark at camp.
Pro Tips for Outdoor Cooking Efficiency
Heat your wash water while you eat. Fill the Sea to Summit sink with water and set it near (not on) the stove while food is cooking. By the time dinner is done, you have hot wash water ready — no waiting for a pot to boil.
The "mise en place" rule applies outdoors too. Before you light the stove, have every ingredient measured, chopped, and within arm's reach. Restaurants do this for a reason. There's nothing worse than realizing you forgot the garlic after the onions are already burning.
Cook once, eat twice. Saturday's chili becomes Sunday's chili dogs. Friday's extra grilled chicken becomes Saturday's lunch wraps. Planning leftovers means you cook fewer meals and spend more time enjoying camp.
Label your cooler zones with colored tape. Red tape on the "don't open this" side (raw meat, long-term cold storage). Green tape on the "grab-and-go" side. It sounds obsessive until you're on day three and everyone knows exactly where the drinks are without opening three lids to check.
For more on camp cooking fundamentals, check out our camp cooking for beginners guide and our collection of cast iron campfire recipes. If you're feeding a crowd on a budget, our budget camp cooking guide has meals under $10. Need a complete weekend plan? See our weekend car camping meal plan.
The Bottom Line
A camp kitchen system doesn't need to be expensive. The essentials — a two-burner stove like the Coleman ($114.99), a Lodge Dutch oven ($49.99), a Sea to Summit wash basin ($24.95), and a solid cooler — will run you about $250-600 depending on your cooler choice. That's roughly the cost of three family restaurant dinners, and the gear will last for years of outdoor meals.
What you're really buying is ease. When the kitchen works, camping feels effortless. You spend more time sitting in a camp chair watching the fire, and less time digging through bins looking for the can opener.
Build your system, test it on a one-night trip close to home, and refine. By your third trip, you'll be cooking campsite meals that rival your home kitchen — and wondering why you ever did it any other way.
<!-- AFFILIATE_DISCLOSURE -->